First Connection
Welcome to your new Senquip ORB-C3.
This chapter will guide you through connecting your device to the Senquip Portal for the first time. Most installations can be completed in just a few minutes.
If you require detailed information on mounting, wiring or configuration, links are provided throughout this chapter to the relevant sections of this User Guide.
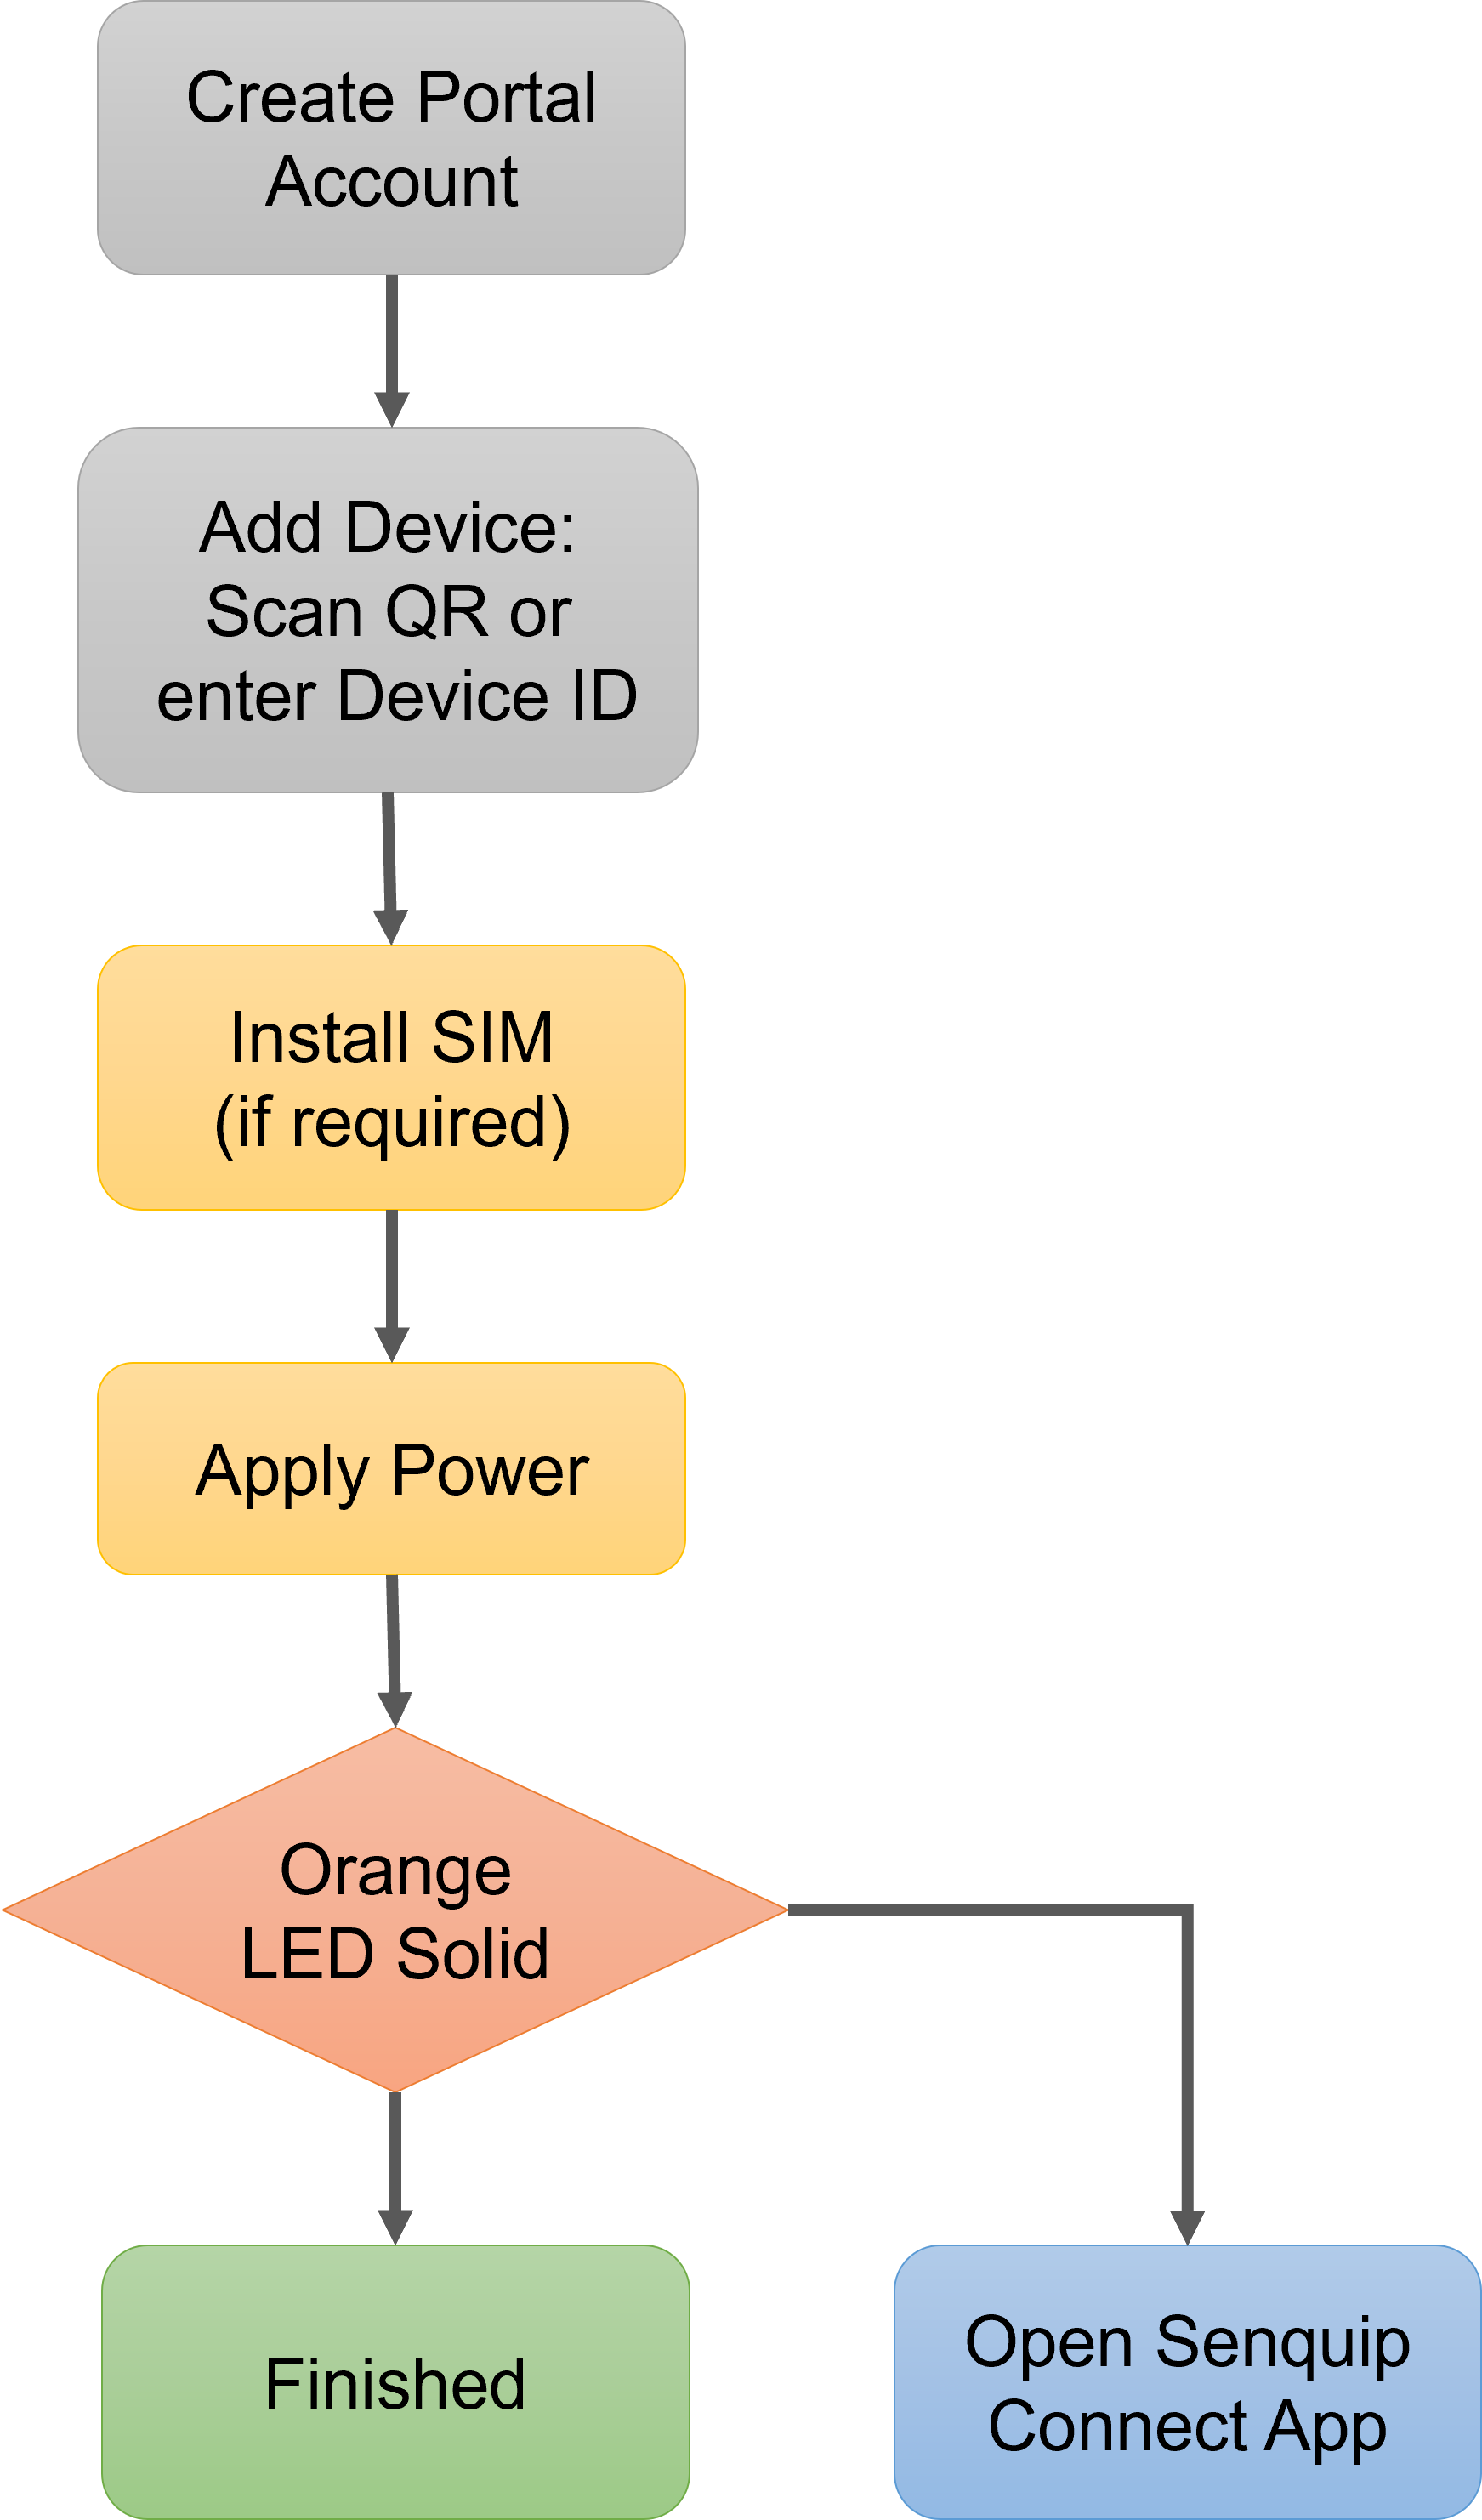
First connection workflow
Before You Begin
Before starting, you will need:
A power source for your Senquip ORB-C3
A mobile phone or computer with Internet access
A Nano-SIM card unless using eSIM or Wi-Fi only
Hint
After initial network setup, it is recommended that all device setup be performed using the Senquip Portal.
Step 1 - Create or Sign In to Your Senquip Portal Account
If you are new to Senquip, create a free account on the Senquip Portal.
If you already have an account, simply login.
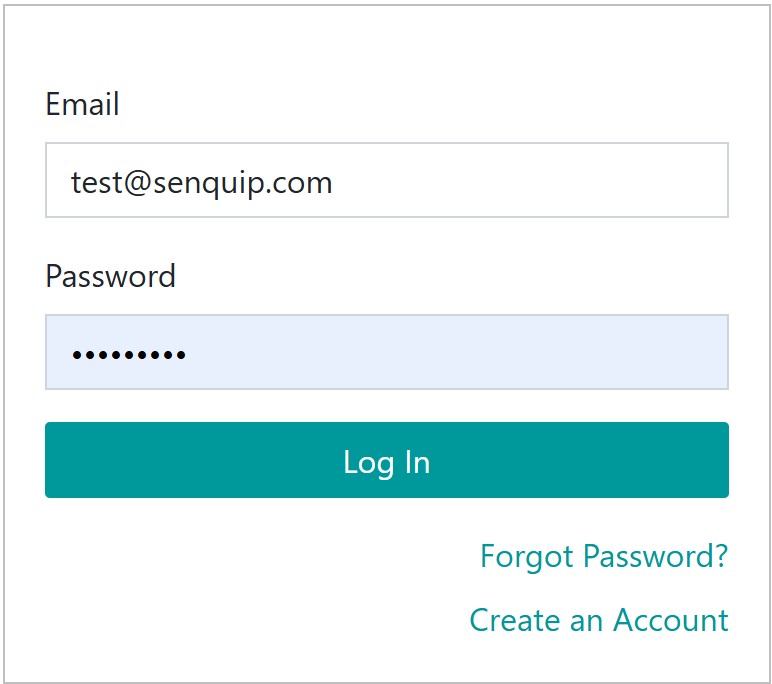
Portal login prompt
Step 2 - Add Your Device to the Senquip Portal
If your Senquip distribution partner has already added the device to your account, you can ignore this step.
Note
For distribution partners and OEMs, devices are automatically added to your account when shipped from Senquip.
Every ORB-C3 includes a Scan to Start QR code on the supplied security card.
The easiest way to add the device to the Portal is to scan the Scan to Start code while signed into the Senquip Portal.
Alternatively, select Add Device from the Senquip Vision Dashboard and enter the Device ID and Setup Password manually.
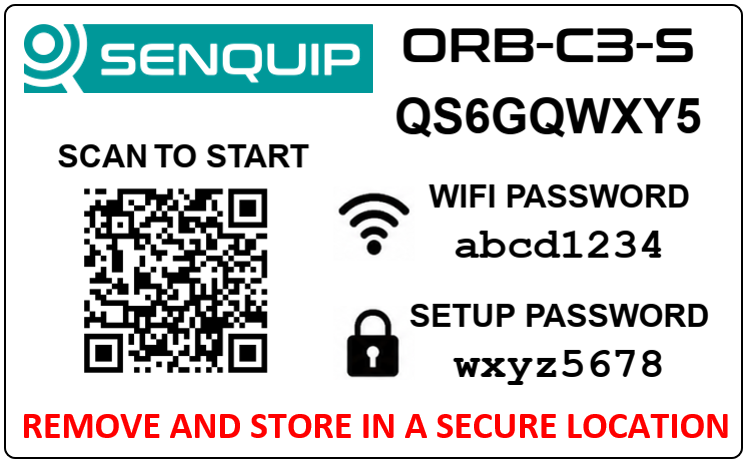
Device credentials card
Step 3 - Install the SIM Card
If you are using cellular (4G LTE) communications, install a Nano-SIM card before applying power. If you are not using a cellular connection, ignore this step.
The ORB-C3 automatically configures the APN for most SIM cards. In cases where the APN needs to be added manually, this can be done in a later step.
Note
An APN (Access Point Name) identifies the network service that a cellular device should connect to. The APN is normally provided by your SIM or cellular service provider.
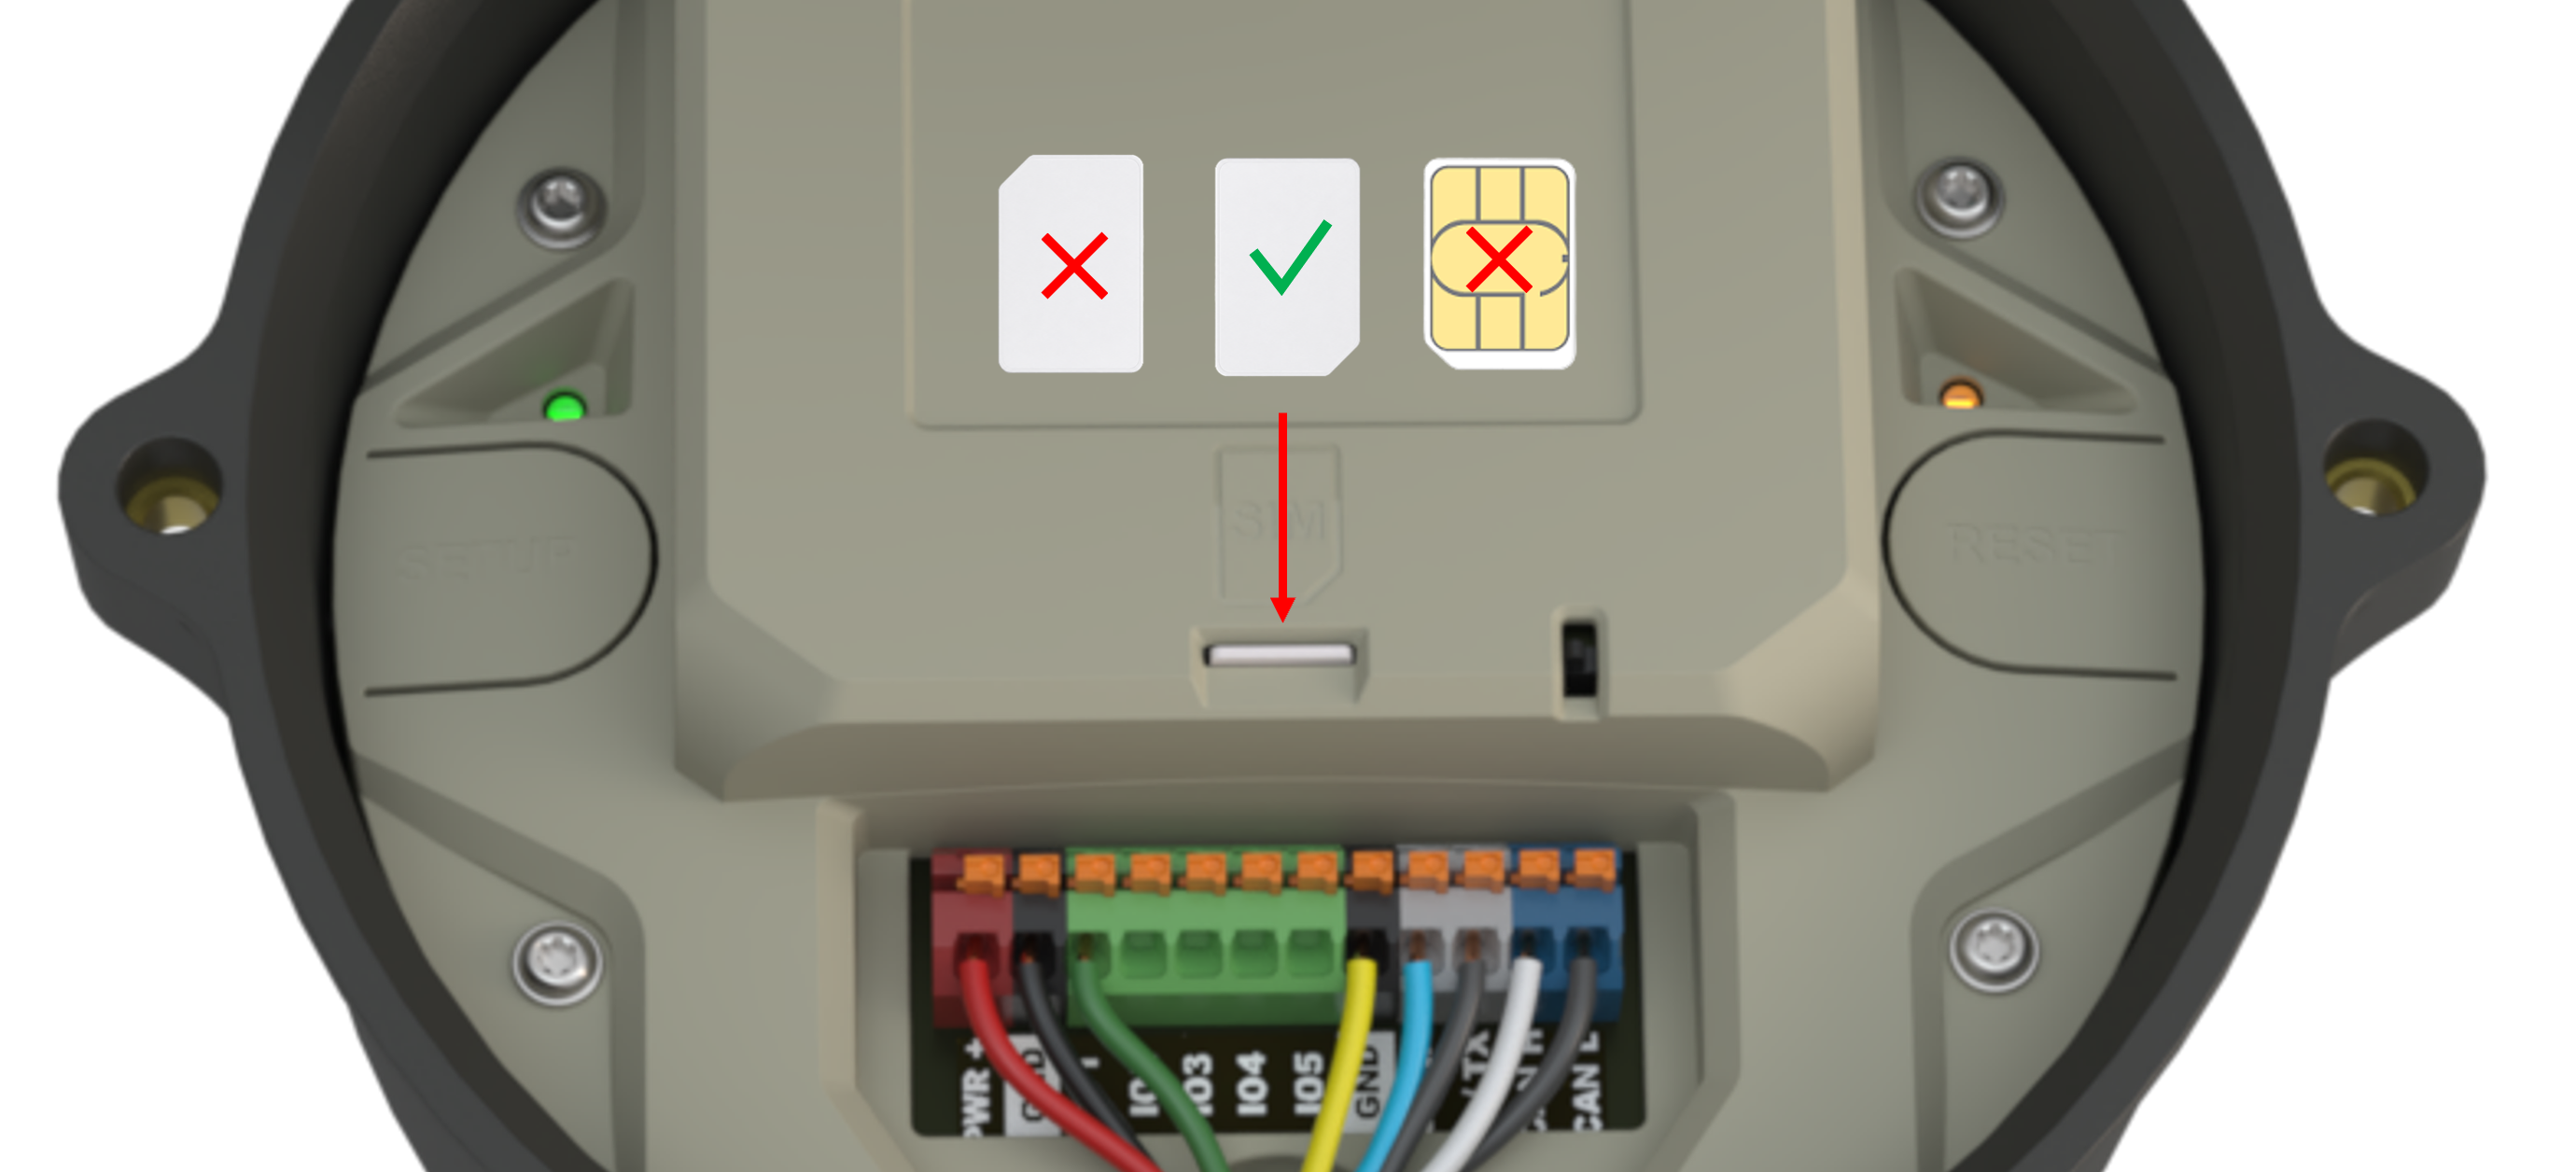
Correct SIM orientation
For detailed instructions, see SIM Card Installation.
Step 4 - Apply Power
Supply between 10V and 75V DC to the ORB-C3.
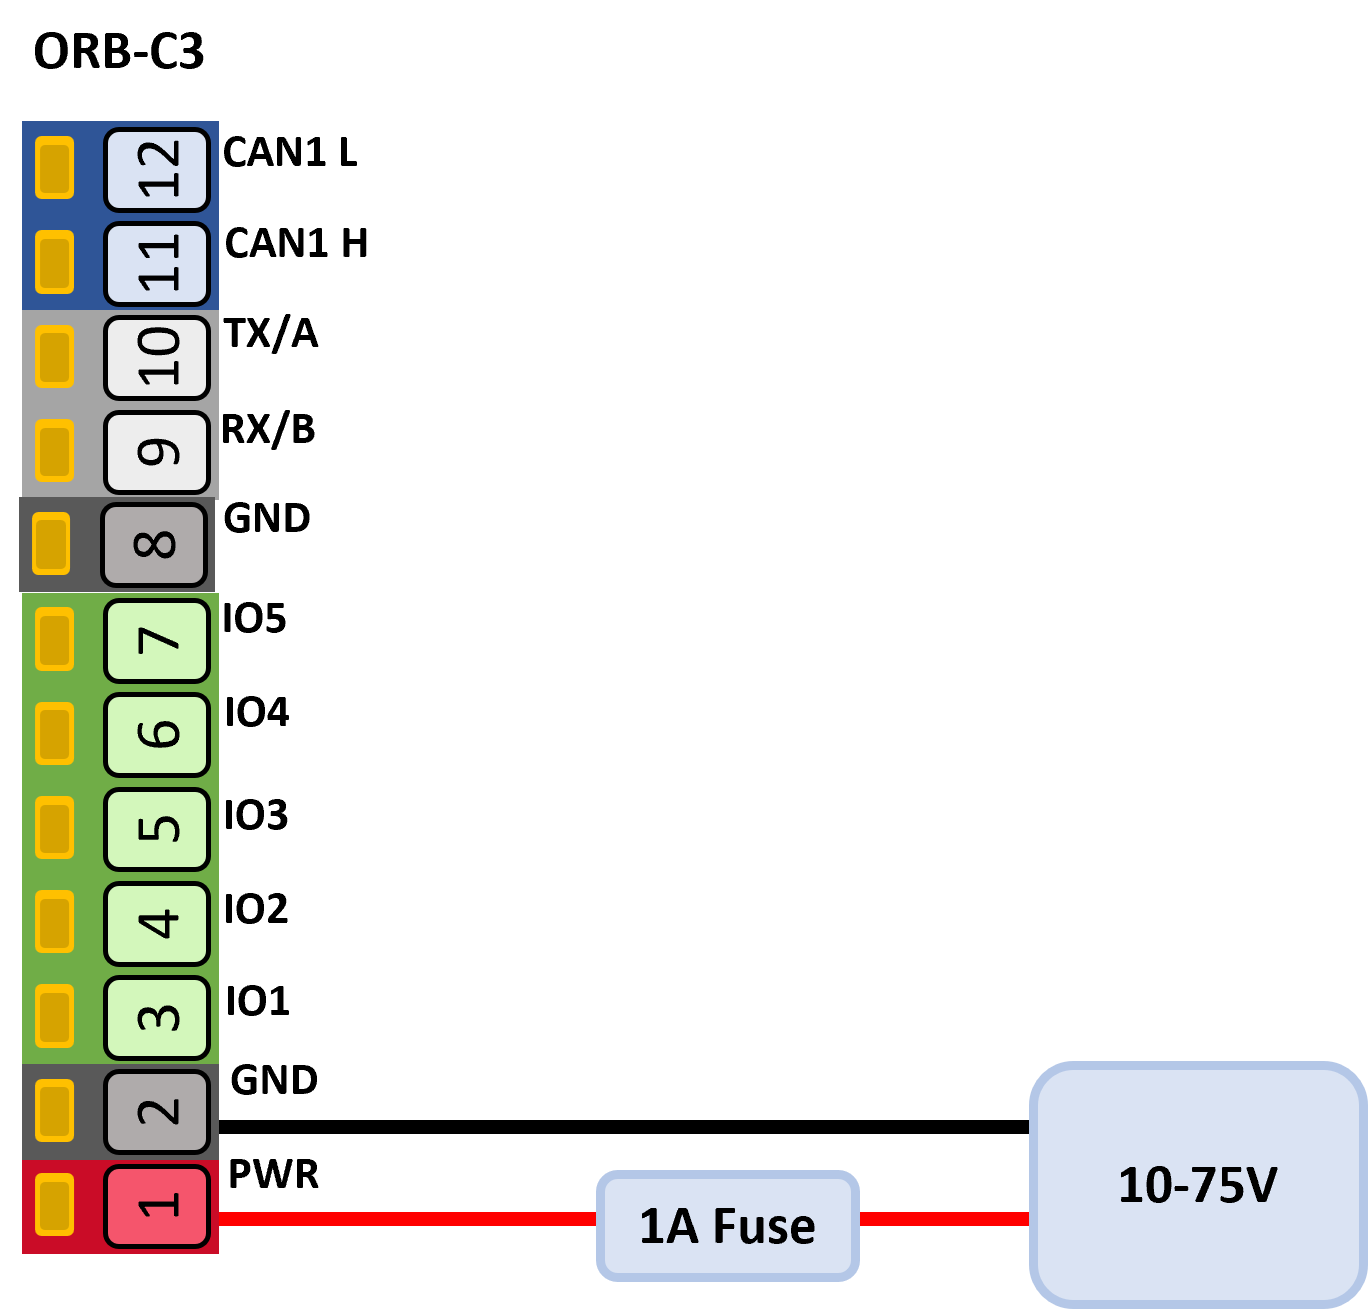
ORB-C3 power connection
The green Status LED should illuminate.
Step 5 - Wait for Cellular Connection
Allow up to ten minutes for the ORB-C3 to resolve the SIM APN and establish a connection.
For most SIM cards, no additional configuration is required.
The orange Network LED indicates progress.
Network LED |
Meaning |
|---|---|
Flashing |
Searching for a network |
Pulse |
Connected to the network but unable to reach the Senquip Portal |
Solid |
Connected to the Senquip Portal |
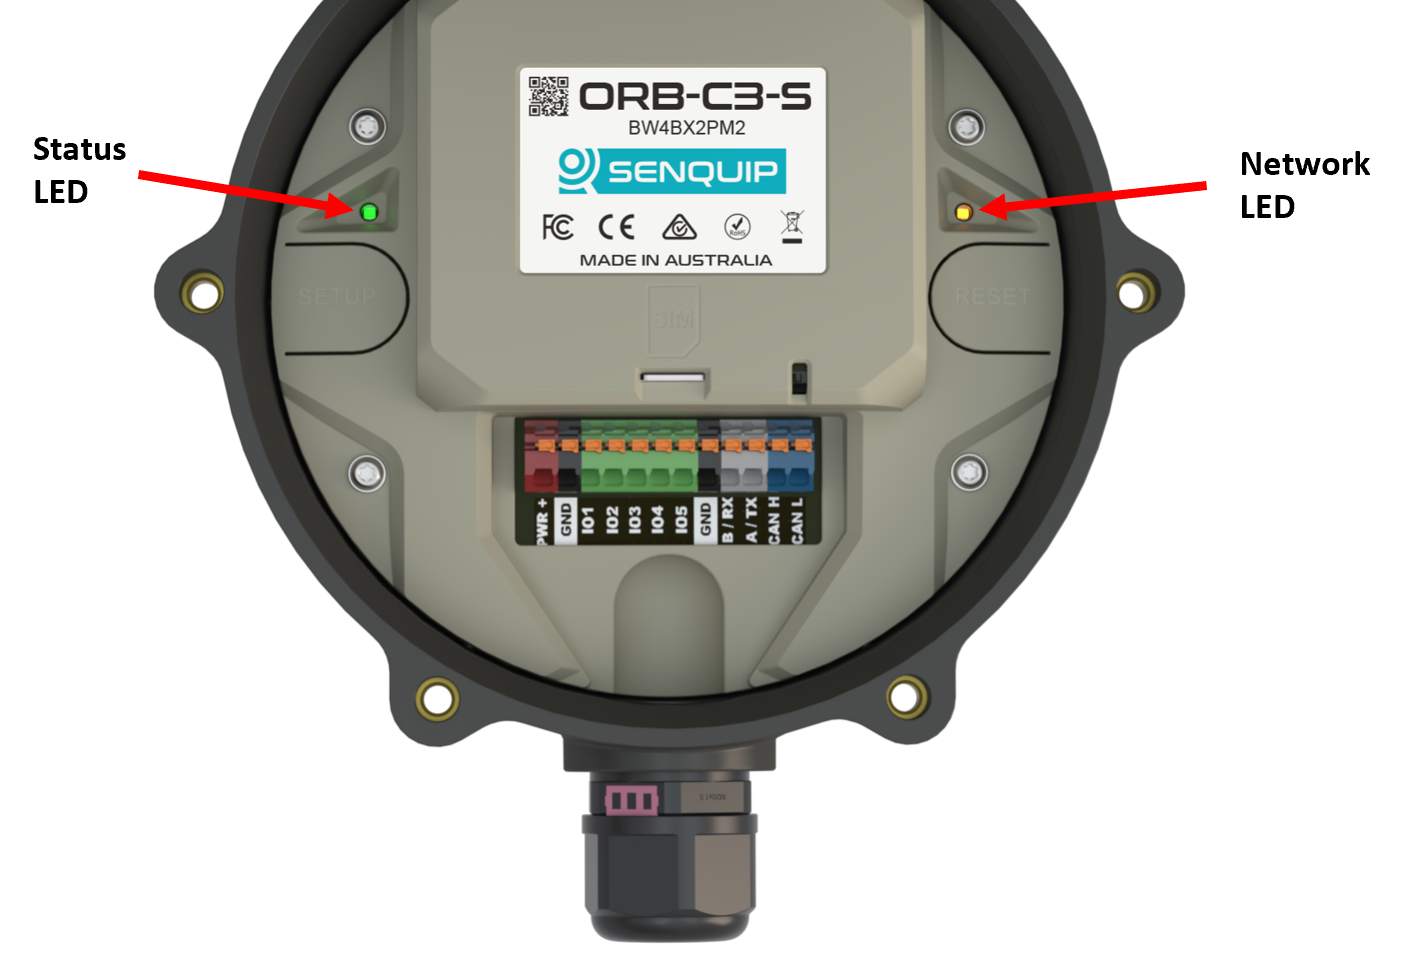
ORB-C3 status lights
If the Network LED becomes solid, your ORB-C3 is connected and no further network configuration is required.
Step 6 - Put the Device in Setup Mode
To enter Setup Mode, press the Setup button on the Senquip device. Once the green light starts flashing, the device is in Setup Mode and you can proceed.
If connected to external power, the ORB-C3 will remain in setup mode as long as the lid is open. If no external power is available, the ORB-C3 will enter sleep mode after 10 minutes of no activity. To re-enable setup mode, press the Setup button again for 2 seconds. Setup mode will be exited once the lid has been closed for more than 10 seconds.
Once the ORB-C3 is in Setup Mode, network configuration can be completed using either of the following methods:
Senquip Connect App (recommended) - configure the device using Bluetooth from an Android or iOS mobile device.
Embedded Web Server - configure the device using a web browser over the device’s Wi-Fi access point.
Choose either Step 7a or Step 7b below.
Step 7a - Configure the Network Using the Senquip Connect App (Recommended)
If the ORB-C3 is to connect with Wi-Fi or the cellular connection does not connect automatically, the Senquip Connect App allows network configuration via Bluetooth.
The Senquip Connect App is available for both Android and iOS.

Scan the QR code to download the Senquip Connect App
Network Configuration with the Senquip Connect App:
Open the Senquip Connect App.
Press Scan for Devices, all devices broadcasting Bluetooth or devices in setup mode will be shown.
Note
The ORB-C3 will advertise itself as ORB-xxxxx, where xxxxx represents the last 5 digits of the ORB-C3 device identifier.
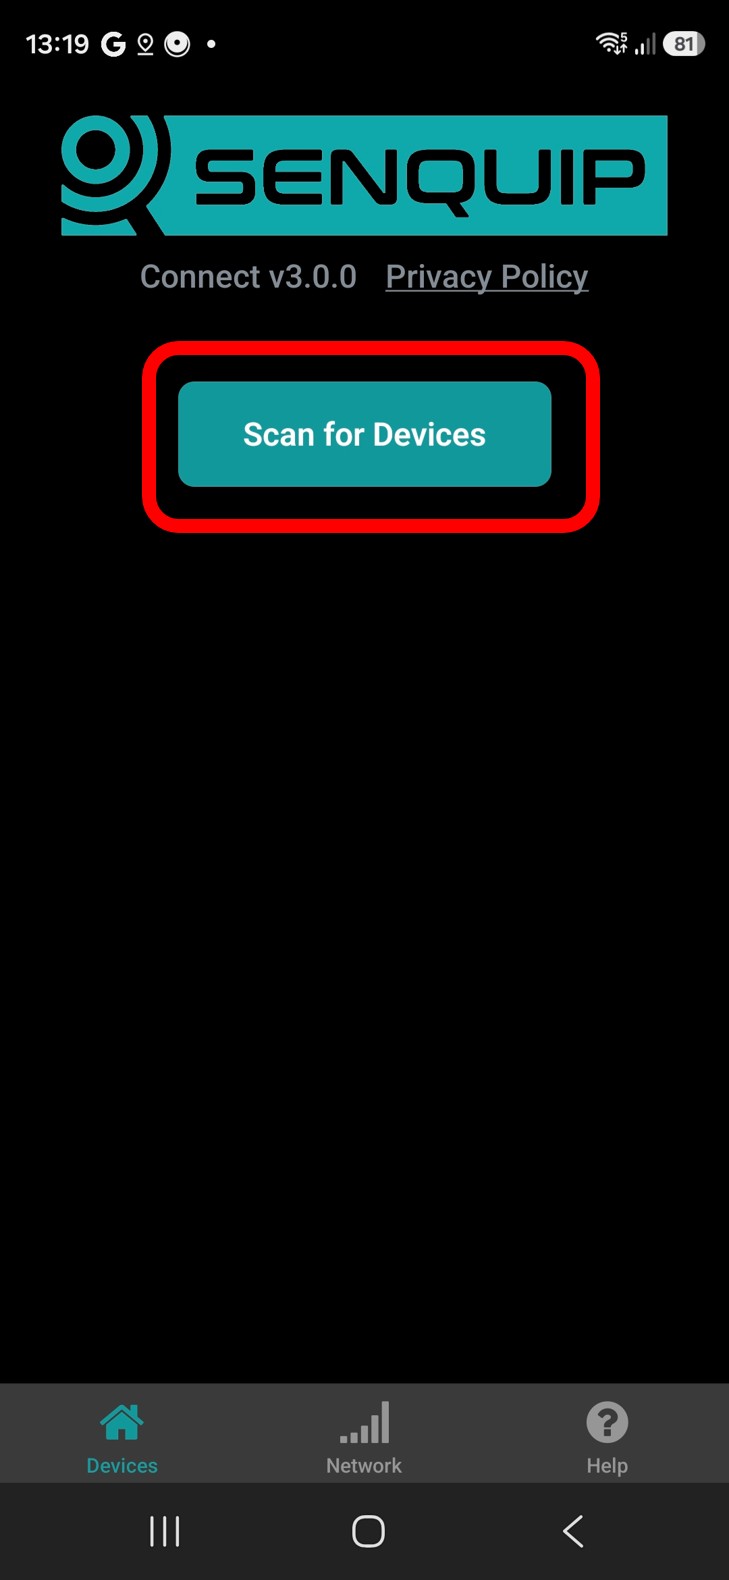
Scanning for devices
Select the desired device and pair to it
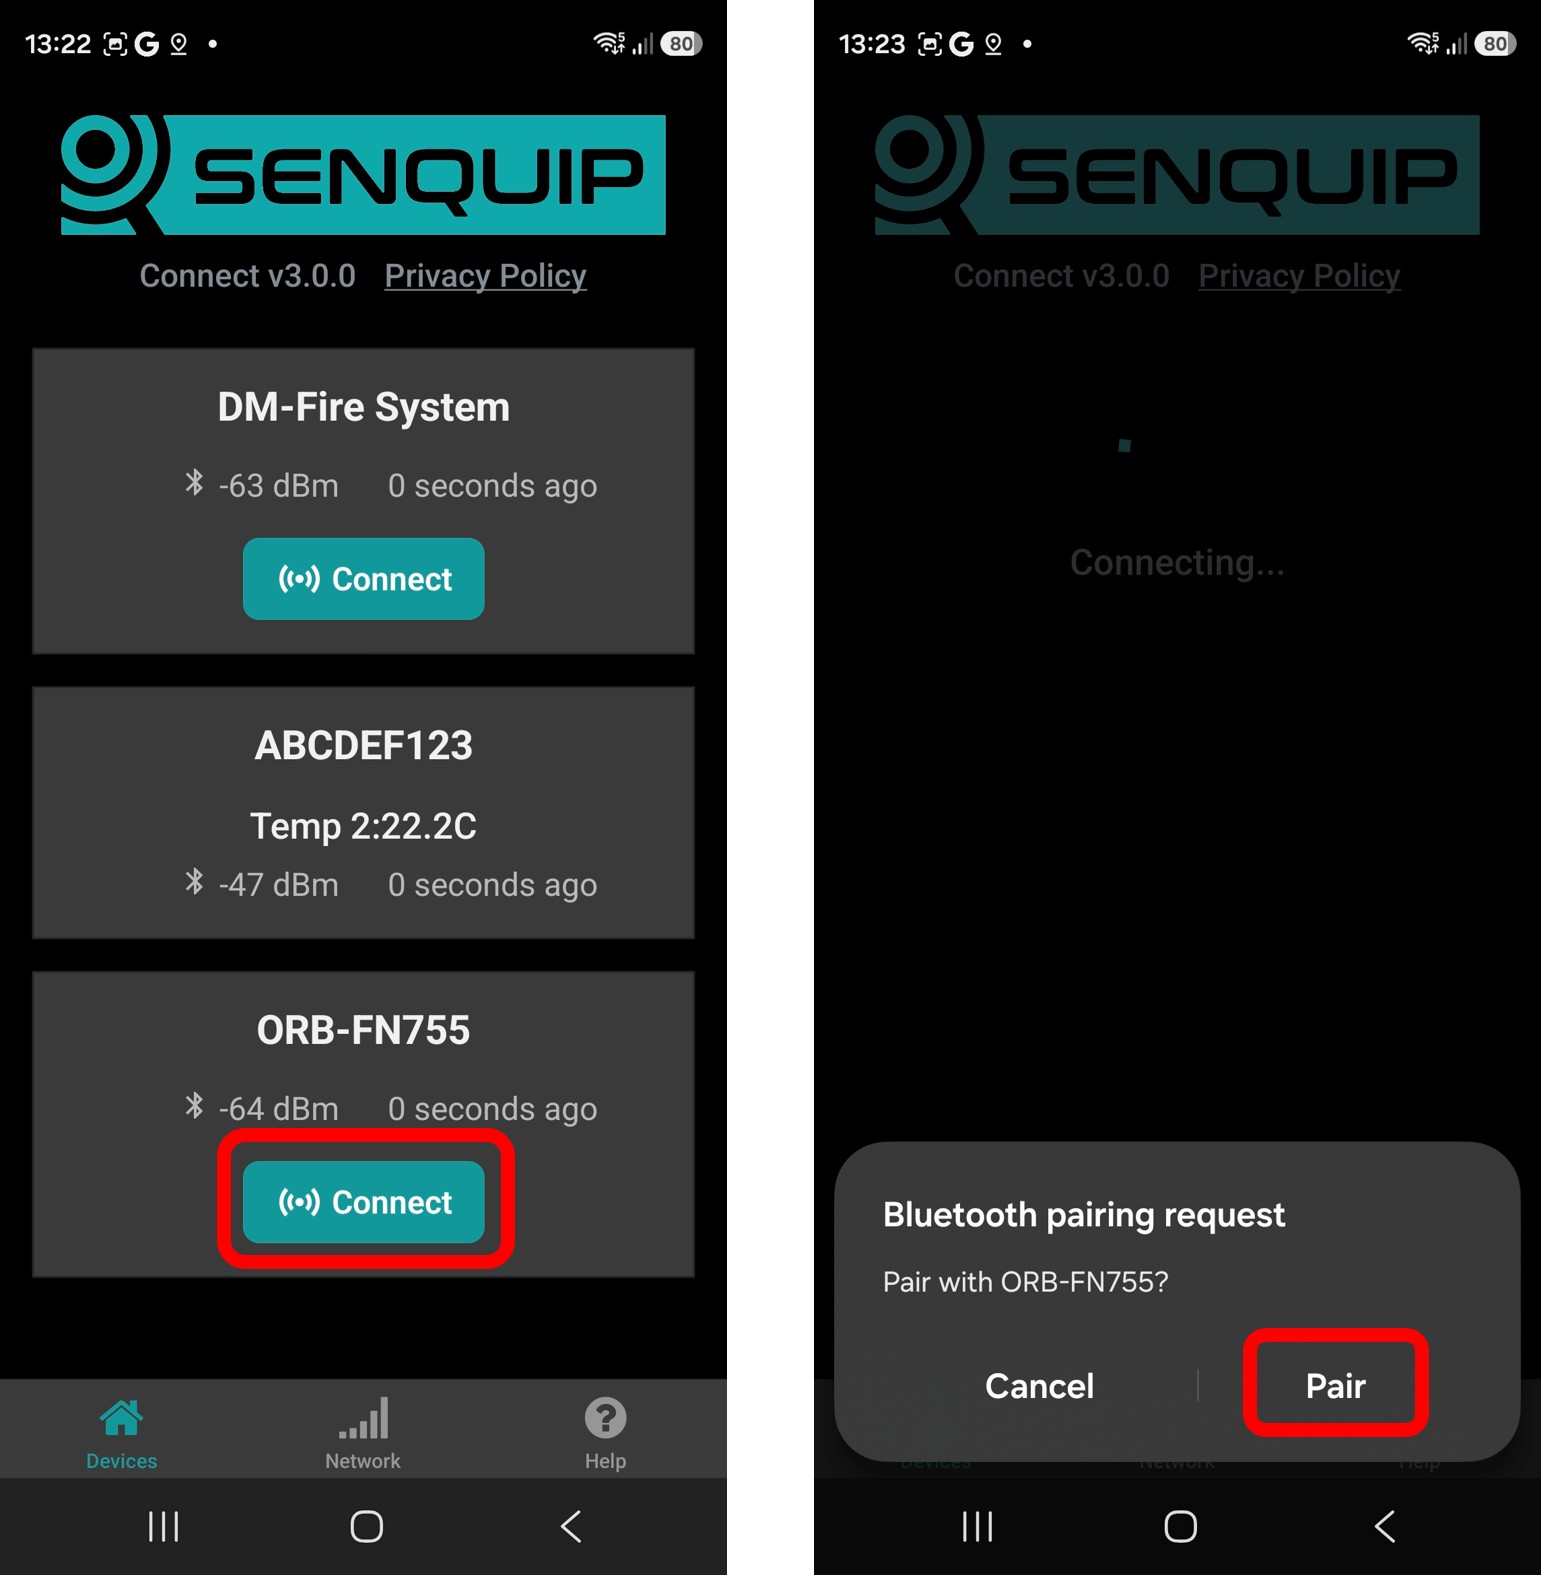
Selecting a device
Enter the device setup password and press Submit.
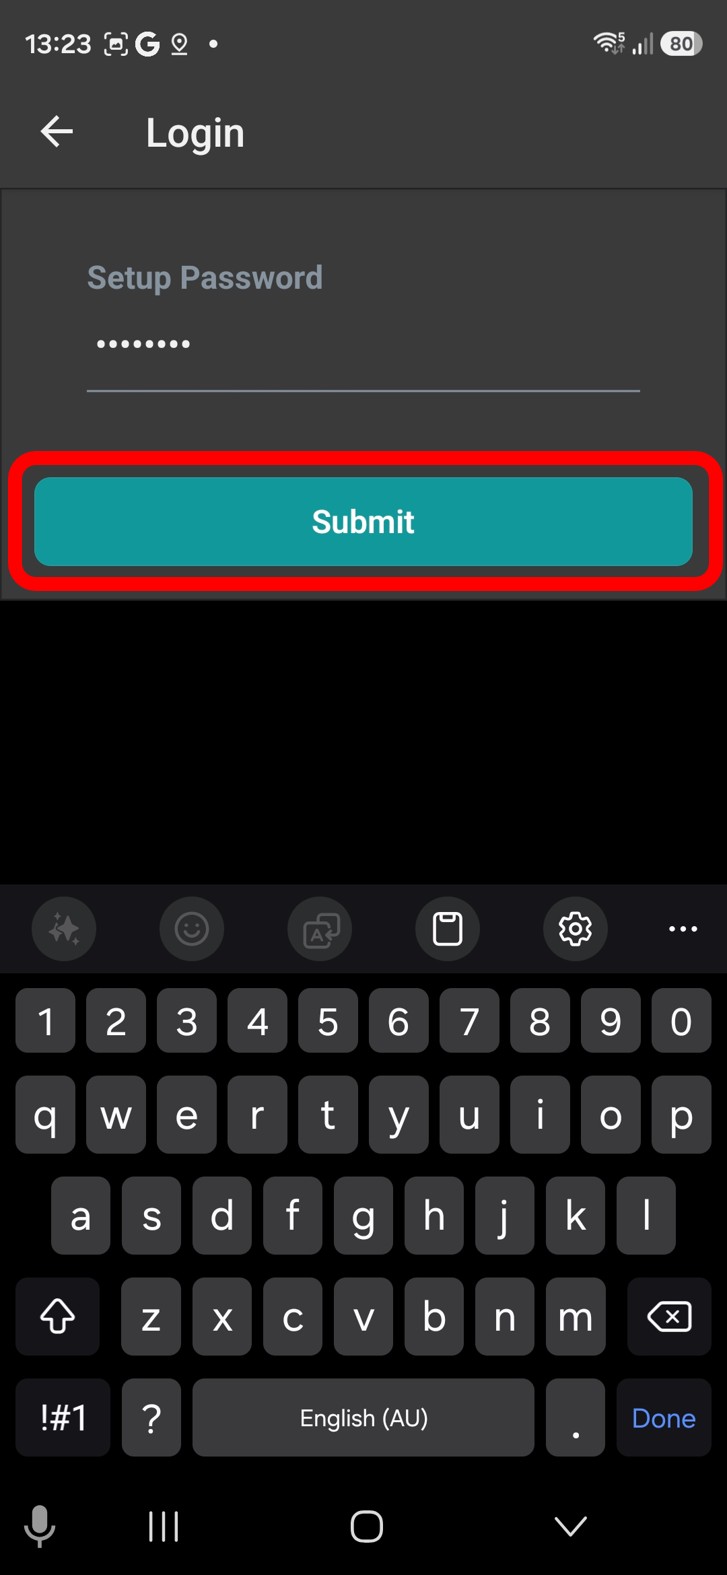
Entering the password
Note
If the device is in a factory default mode, passwords are not required.
Select either Configure WiFi or Configure Cellular / LTE.
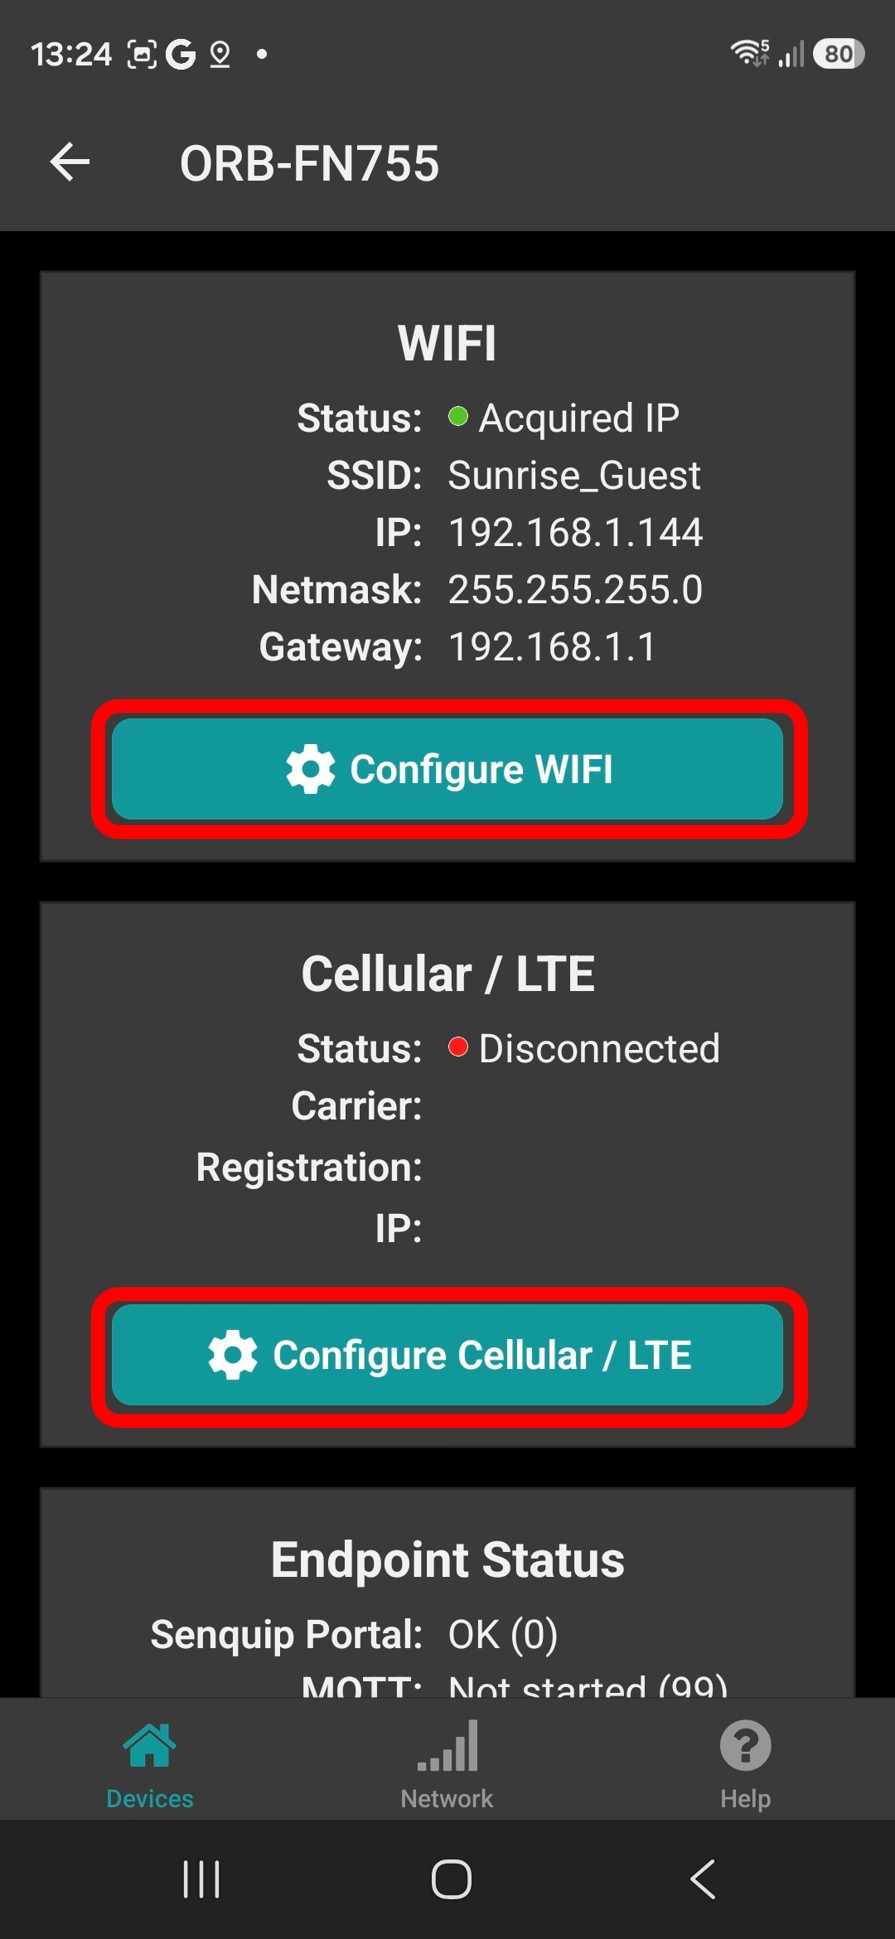
Choose Wi-Fi or cellular configuration
Enable the connection method.
7a. For Wi-Fi connections, enter the Wi-Fi SSID to which the device is to be connected and the password for that network.
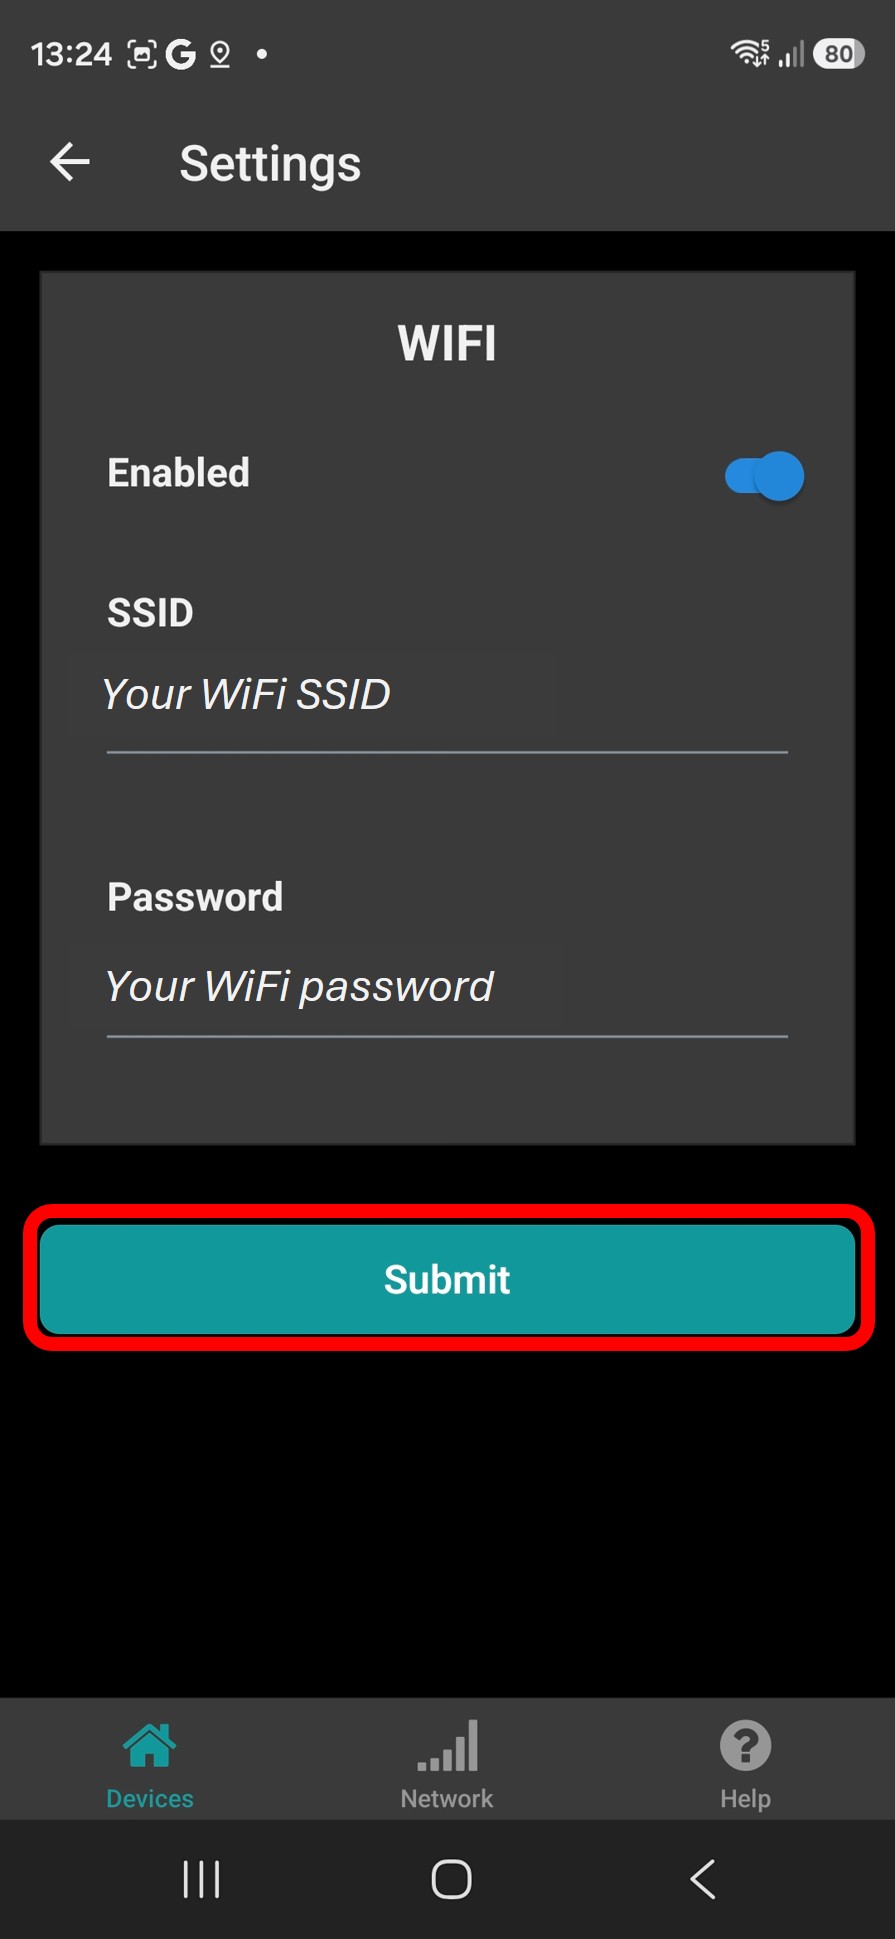
Configuring Wi-Fi
Note
The ORB-C3 operates on a 2.4 GHz frequency only
7b. For cellular connection, disable Auto APN and manually enter the APN. In very few setups, the SIM card will require a username and password. Enable roaming if this is a roaming SIM.
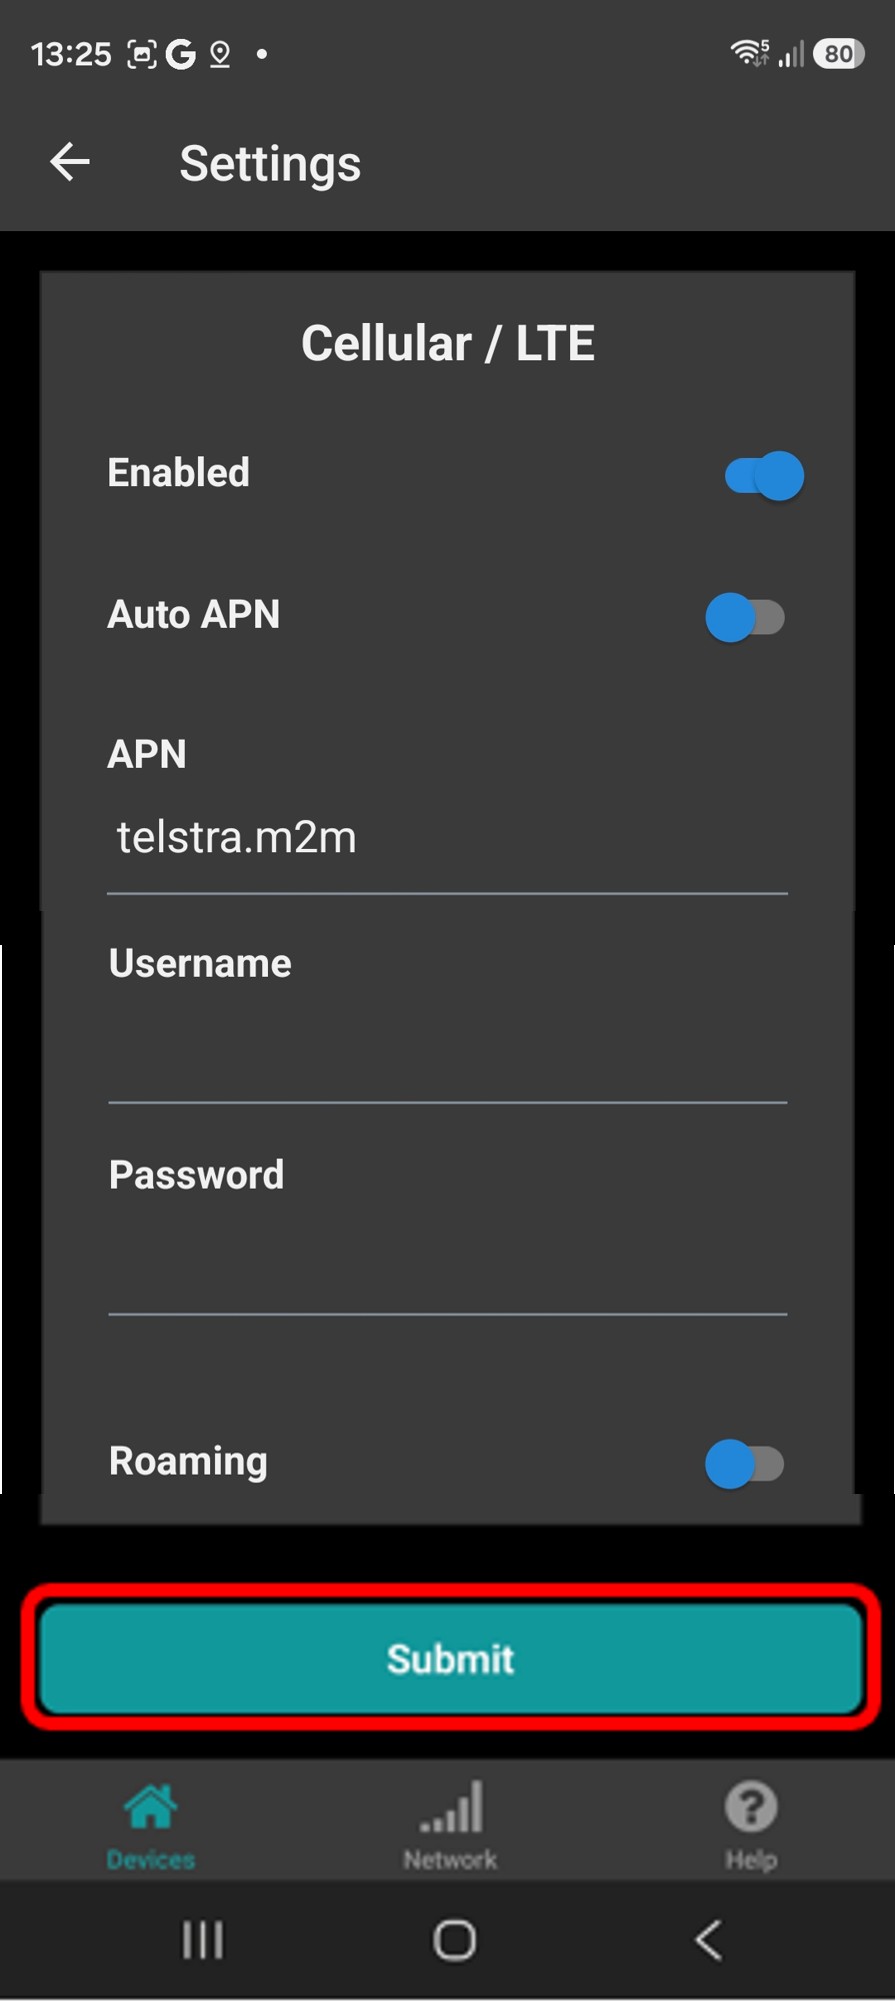
Configuring cellular connection
Note
Roaming SIMs may be de-prioritised on busy networks
Press Submit. The device will save the details and will reboot and attempt to connect to the network. Connection progress can be monitored on the Senquip Connect App.
Step 7b - Configure the Network Using the Embedded Web Server
In setup mode, a device Wi-Fi Access Point (AP) is enabled that allows for initial setup. In this mode, a user can connect to the ORB-C3 using any computer, tablet or mobile phone that has Wi-Fi and is loaded with a browser.
Note
The Senquip ORB-C3 Wi-Fi Access Point is 2.4 GHz only
Network Configuration with the Embedded Web Server:
To connect to the ORB-C3 access point, search for available Wi-Fi networks on your Wi-Fi enabled device.
Note
The ORB-C3 will advertise itself as ORB-xxxxx, where xxxxx represents the last 5 digits of the ORB-C3 device identifier.
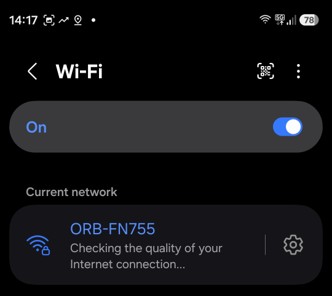
Connect to the Senquip device access point
Enter the Wi-Fi password as found on the Device Credentials Card.
Warning
Modern phones are cautious of unknown and non-internet connected networks. You may need to ignore multiple warnings. You may also need to change mobile device settings to prevent it from switching to an alternate internet connected network.
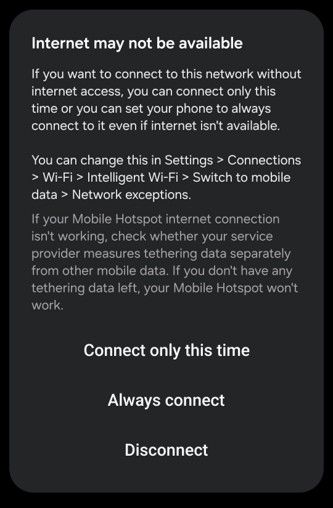
Typical network warning
You should now be connected to the device access point. Being connected to the ORB-C3 access point does not allow you to view or change any data yet.
To view and change settings, you need to login to the ORB-C3 web server. Open your preferred web-browser (Senquip recommends Chrome) and type the address of the ORB-C3 web server (192.168.4.1) into the address (or search) bar. Expect more warnings that need to be ignored.
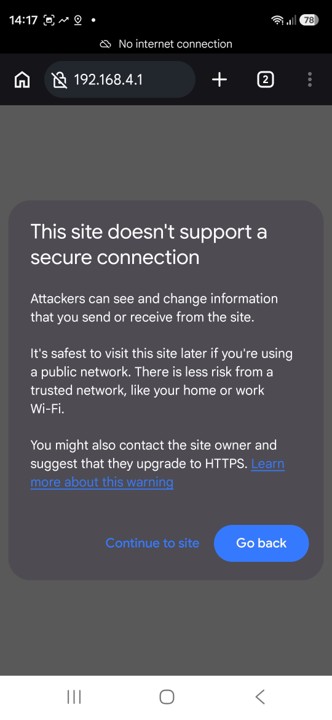
Enter the device web server address
Login to the device web server with username Admin and the setup password from the Device Credentials Card. Press Sign in.
You should now be connected to the device web server.
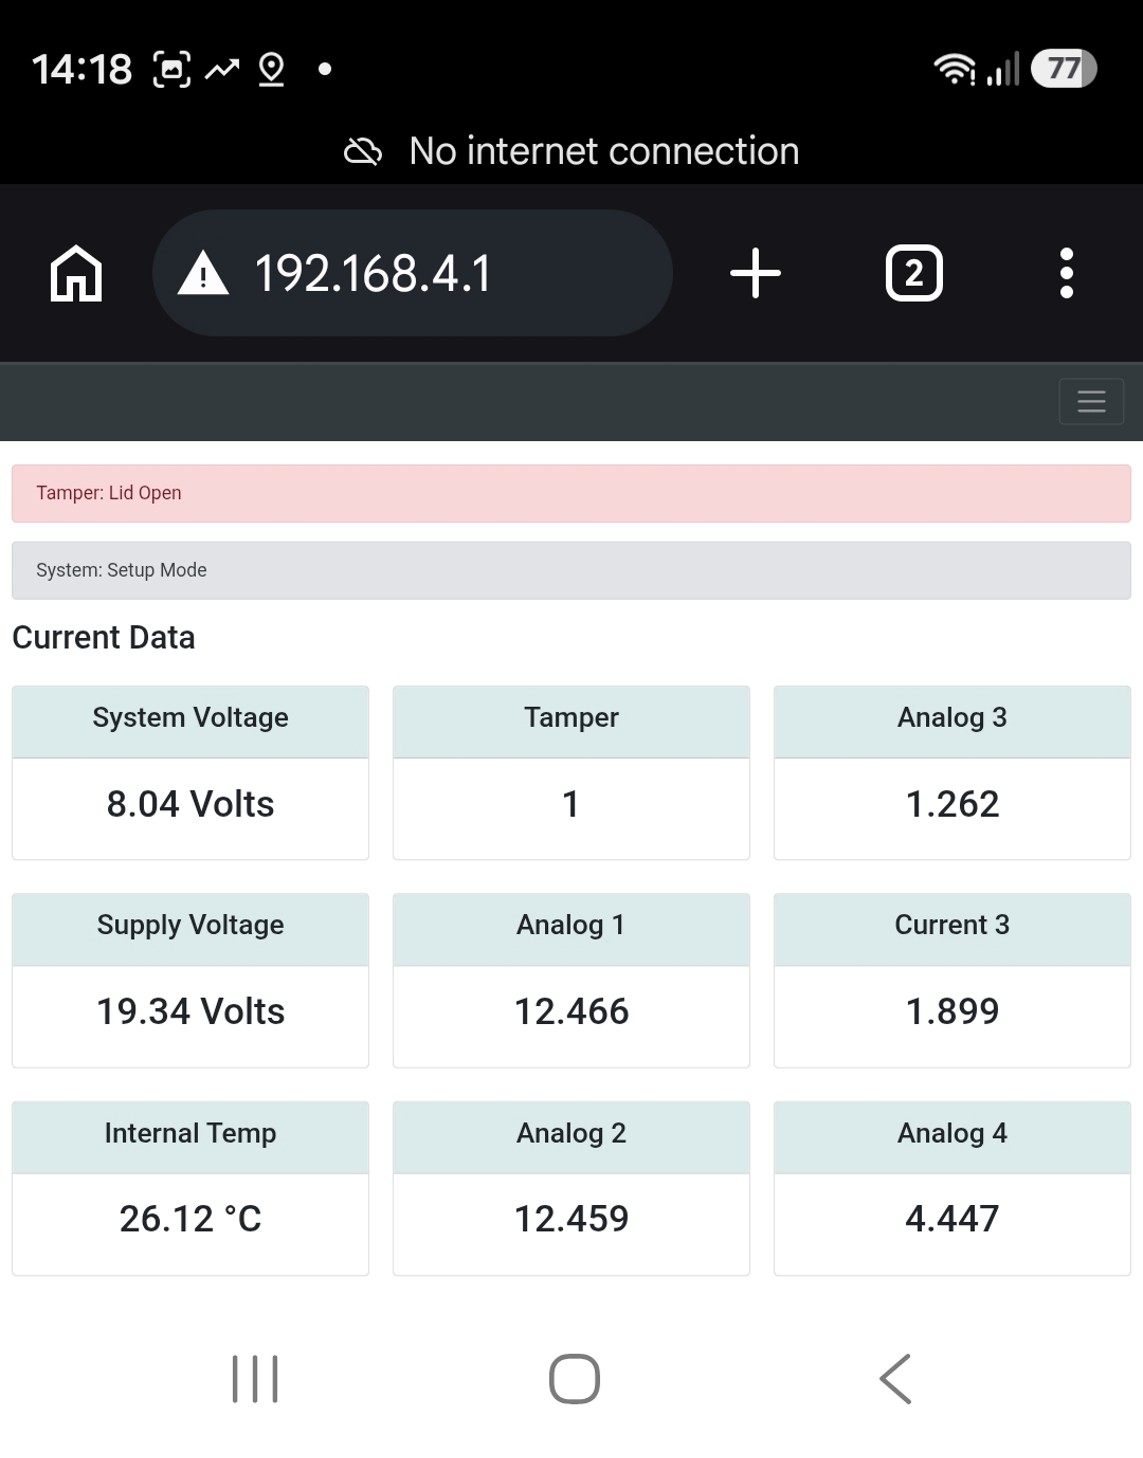
Enter the credentials for the device web server
Using the menu icon (3 horizontal stripes) on the top right, select Network. From here you can configure the network settings.
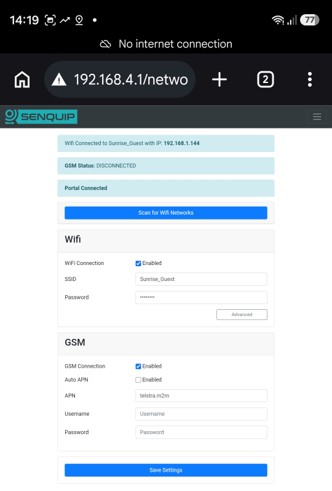
Configuring the device network settings
Note
You can also configure other device settings, but this is easier to achieve using the Senquip Portal once the device is connected to a network.
Note
You can change the device setup password using the Admin tab in the menu.
Note
Performing a factory reset will reset the passwords to their defaults as found on the Device Credentials Card.
Enable the required connection method.
7a. For Wi-Fi connections, you can use the Scan for WiFi Networks button and select from available networks or you can enter the Wi-Fi SSID to which the device is to be connected and the password for that network. Additional advanced network settings are available but are rarely used.
Note
The ORB-C3 operates on a 2.4 GHz frequency only
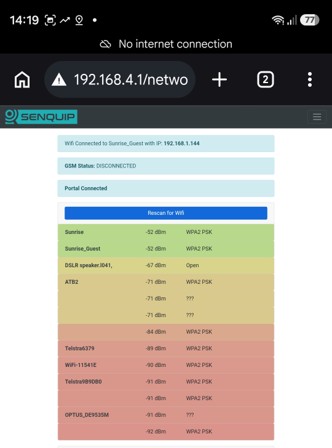
Results of a network scan
7b. For cellular connection, disable Auto APN and manually enter the APN. In very few setups, the SIM card will require a username and password.
Press Save Settings. The device will save the details and will reboot and attempt to connect to the network. If the orange network light goes solid, then the device is connected.
Step 8 - Continue Setup in the Senquip Portal
Your ORB-C3 is now connected and ready for use. View measured data and continue device configuration using the Senquip Portal.
For more information, including User Guides, Application Notes, Tech Tips, scripting examples, firmware updates and other technical resources, visit the Senquip Documentation Page.
Troubleshooting
Problem |
Suggested action |
|---|---|
Green Status LED is off |
Check the power supply and wiring. |
Network LED flashes continuously |
Check SIM installation, network coverage and SIM activation. |
Network LED pulses |
Check Internet access, firewall settings or APN configuration. |
Device does not appear in the Portal |
Confirm that the device has been added to your Portal account. |
Automatic connection unsuccessful |
Open the Senquip Connect App and complete the network configuration. |